EOSERV Forum > Artists > Pixeling guide for new people.
Topic is locked.
Page: << 1 2 >>
Pixeling guide for new people.
Author Message
Post #40399 Pixeling guide for new people.

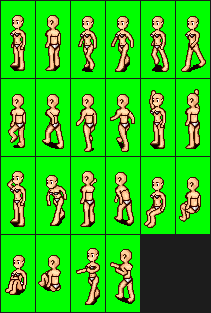
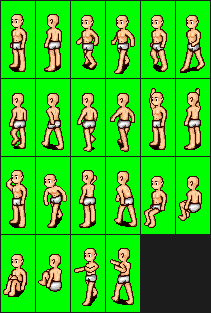
!!Make sure you click on the links with ur "mouse wheel" so it will open a new tab.!!

I already got +1'ed by posting a part on another post!!

I will Update this guide, whenever I have more idea's and time!

====================================================================
Software - Pixeling guide V.1
====================================================================

Well hai people, I decided to edit this post and add some new stuff to it.

Before you start pixeling you need a good program to start with ofcourse.

Let's start with: Microsoft Paint.

almost/everyone has this.

Personally I don't really like working with paint, it's very annoying when you have to switch between colours.


Graphic gale.

Graphic gale is a really good software to pixel with, this program is made for these kinds of things.

You can easily change colours by right clicking on the colour you want.

Also you have layers to work with, this is very usefull when sheeting armour or weapons.


Adobe Photoshop.

This is a very expensive but usefull program, it's not made for pixeling but it has allot of usefull options.

You have a great zoom +/- option and allot of other features like, easy Hue/Saturation recoloring.

Personally I don't like the "tools" like blur and smudge, but it's all inside this program.

(If you illegally download it, you cannot sell the products you make with it, school and work "keys" are included).


GIMP.

This has about the same options as photoshop, the interface is a bit harder to understand.

The only big difference is that it is opensource, means you don't have to pay for it.


For a more detailed guide please click me.

====================================================================
Outlines.
====================================================================


I will start off by telling you how to make the outlines for the Endless Online sprites.
Maybe you've noticed the sprites in Endless Online (or any private server) are "isometric".
Isometric is that the sprites are like "diagonal" on ur screen, like it has been rotated by 120 degrees.
Anyway, the reason why it's isometric because it will look more like a 3 Dimensional environment.
Just take a look at this sprite.

Click

I've seen allot people making armors and/or robes/skirts, but they don't realize that they don't make it isometric.
Let me show you an example.

click

Oyesh, look what I made sexy uh.
Well you should notice it isn't shaded properly, we'll get that later.
Also it doesn't really look good either, I critism on that would be it's not isometric.
Now let me show you the isometric one.

Click

Aaah! that's better don't you agree?
Guess I got to show you how and what I did exactly.
Well I simply followed the body lines, even though it's a sprite you have to look at it as it is real.

Click

No, WHAT!? Im not a perv... seriously...
Anyway, I colored the leg infront blue and the one in the back red.
Let's say ur the female standing there, and you would wear a skirt.
How would it look if you make it on a sprite? yes Indeed it would look like that.
and not in one line like ________ because if you look at the feet (position) on the floor, one feet is placed higher then the other.

Another thing, outlines should be darker then the inside so it would blend in the background.
Some people don't notice that you can use the outline to shade too, I mean don't use it to much though.

Next will be shading.

=======================================================================
Shading.
=======================================================================

Let me show you the basics of the shading in pixel art.
First off you've probably heard that "pillow" shading is the bad way to shade ur armors/weapons.
It's true! (NOOOoOOoo) It'll make ur creation like a pillow just like shown bellow.

Click

A way to prevent that, is to picture a sun or a light source in the left corner of ur screen.
And picture that the light is shining on ur creation from that spot.
Means you should get something like this.

Click

Event though that doesn't really look good, we should make the sun/lightsource a bit brighter.
And add more contrast between the colours, check picture bellow.

Click

Ok now we're getting to the hard part, this is about the "dithering" yes dithering.
This is probably one of the hardest part of shading, you shouldnt over abuse the dithering technique.
Now let me explain what dithering does.
Pixel art is known as art with just a few colours, you can create an illusion to the eye by putting 2 different colors next to eachother like a checkboard.
It will look like a gradient and create a 3rd color, look image bellow:

Click

Ok, the last thing I want to say about the shading is that EVERYTHING has glossiness.
This means you should really think about the contrast of the objects.
Like Polished metal really has to shine!
Look Image bellow, 1st = Metal  and the 2nd = Snowball.

Click

=================================================================
Making a plated armor.
=================================================================

Now we've had the basics of outlining and the right way of shading we should make something.
Ok, let's make a simple armor for the male character.
First we need a sprite sheet, which can be found here.

Female
Male

Now we should draw the outlines, make sure it looks isometric and personally I like making them red or blue.
The reason I do that, is that I don't mix the outlines with the background and/or character.
Ok here's my outline.

Click

Ok, now we have that down we should start by coloring the armors inside.
I always do the shoulder plates first, Notice where the light source is shining from.
(I put arrows there to make sure you'll notice).

Click

Ok now the coloring the rest, and add the light abit.

Click

After we got the basic shading down, we can add the darker shade and ofcourse fix the rest.
Make sure you'll shade it as a real armor, it has to be shiny!

Click

It looks hard, but if you practice a bit it's very easy. (I rushed the plate)
Still I don't really like it, let's add a trim and maybe a cape.

Click

There we go, if I'd count the colours used.. It would be around 13 unique colours.
NOTE: This is a tutorial plate I made, used to show how to make it.
This is not my best work or w/e <- just wanted to say that xD.

Oh, maybe you noticed the character sprite I used is different then you got.
That's because that was my custom shaded sprite I made for FE.

=================================================================
Npc-ing.
=================================================================

Next I'm going to show you how to make a npc.
First off we start with the outlines again, BEWARE! the hardest thing is to make it ISOMETRIC.
In the past I've had allot of failures with the isometricness of the npc.
Well to help you should draw 2 lines like this.
After you did that, you should make the npc (make sure that the right side is higher then the left).

Click

Ok now we got that down, this is always the hardest part of npc-ing.
After that we should highlight where the shades should be, kinda like we did at the armour.

Click

I also added the legs this time, Oh you noticed it's an ant!
Not just an ant It's DA QUEEN.
Anyway, while we got that down we should choose the correct colours to shade it.
Let's google an ant, and look at those colours.
Aaah here we go.

Click

Ahh, yes it looks good don't you think so?
Well let's make the outlines of the back part a bit lighter and shade the legs properly.
Make sure you shade like I taught you before.

Click

Tadaaa, done is our ant queen.

=================================================================
Making an Inventory sword view.
=================================================================

This is like my 100st edit :), well anyway let's make a sword.
Like you know a sword isn't completely flat.
So let's draw the outlines, and keep in mind it isnt flat!
(Look right corner).


Click

Ok,like you see I drew a line in the middle, this is the point where we have to shade.
So the next thing we'll do is highlight the shading area's.
It'll be easy shading and adding detail after, ok let's do it.

Click

This was just using the paintbucket tool, nothing hard about it.
Notice how you can shade the outline, It's really neccesary to do that with
a weapon to make it look sharp.
Let's add the rest of the shading.

Click


:) that looks better doesn't it?
I added some slightly lighter shadings to add the "metal effect".
This is what you really should remember, it could also be used for armours/shields etc.
Well that was our sword, I suggest you copy/paste it to look from close ;).


=================================================================
Choosing ur colors and general tips & tricks.
=================================================================

So, now we got that down, I'll show you some "materials" or a "palette" you could use.

I made it circles so I'll be able to show what material should be, like dithered or not.


Click


1st row:

Iron

Copper

Gold

Silver

Old iron/steel (notice the colour difference, It's not as glossy).


2nd row:

Red plastic

Blue plastic

White fabric material (cloth)

Black fabric material (cloth)

Purple/blue plastic


3rd row:

Desert sand/rock

Snow

Grass

Ice

Lava


Those are one of the basic colours you should use, but you should learn urself how to choose/pick colours.
As example I'll show you how I used to shade yellow and ofcourse the new one.

Click

The yellow-> green one was just by sliding the black-white bar darker which makes it green.
While you should add a bit red to make it orange and make the yellow shading look way better.
(unless you want it to be green).

Other thing's you should watch is that you don't make the colors to bright like some people like to do with green/red/yellow/blue.
It makes it unrealistic and bad so you have to mess around with the grey-scale a bit to fix that.

Other things you should remember:
Always save as PNG/GIF/BMP, but Png is the standard. (JPG IS BAD BAD BAD BAD).
You can also shade the outlines (but that is for ur own taste).
Take ur time and don't rush it like me :).
Take reference pictures, but do NOT  copy & paste or RECOLOR, this is not considered as UR art.

That's about it, I might add some more later.
Ok ty for reading, good luck.


Credits:

Arvid - Original Endless Online Graphics.

Reuben - For making and uploading the character sprite (link)

Roefl - For making this whole guide.


~Roefl


13 years, 46 weeks ago
Post #40421 Re: Pixeling guide for new people.

Cool,
i always wanted to learn how to pixel, and this guide sure tells me how to pixel, including pixels,
a moderator +2 this dude for an outstanding tutorial.

13 years, 46 weeks ago
Post #40463 Re: Pixeling guide for new people.
perfect posted: (19th Jun 2010 11:03 pm)

Cool,
i always wanted to learn how to pixel, and this guide sure tells me how to pixel, including pixels,
a moderator +2 this dude for an outstanding tutorial.


I've already had a +1 by posting the "outline/shading/Npc-ing" on another topic.
Anyway I added software,weapon,materials to this guide.
I hope people be reffering to this guide more, instead making new topics :).
13 years, 46 weeks ago
Post #40775 Re: Pixeling guide for new people.


Very nice, Graphics Gale is another program thats very useful. It's like photoshop, but loads much quicker, supports animations,great for using RGBA colors and has excellent zoom =]

---
Hmm.
13 years, 45 weeks ago
Post #42516 Re: Pixeling guide for new people.

Hey, i dont understand how to shade still :P can u do a even MORE detailed guide (if possible :P)

13 years, 43 weeks ago
Post #42520 Re: Pixeling guide for new people.
Snow posted: (7th Jul 2010 01:07 pm)

Hey, i dont understand how to shade still :P can u do a even MORE detailed guide (if possible :P)


Any specific things you don't understand in the shading department.
Like as example, Dithering or how to not pillow shade..

Anyway, I was thinking about making a video.. although my Mic is broken xD.

Edit: Guess I could make it like Step 1: textextextext - I will update this post if I have made a vid (or decided to)
13 years, 43 weeks ago
Post #42694 Re: Pixeling guide for new people.


I Dont get ANYTHING about shading. :P

13 years, 43 weeks ago
Post #42697 Re: Pixeling guide for new people.
Snow posted: (8th Jul 2010 07:15 pm)


I Dont get ANYTHING about shading. :P


Well, It's actually quite simple.
Endless Online uses the "left corner" light source (In shading), which means you have to shade from the left corner to the right.
Ofcourse you should take in mind it's a character and that has shapes too.

Ok, As example let's shade this pokeball.
First we put an imaginary lightsource (sun :D).

Pokeball - click with mousewheel

Ok, Now we shading the spot where the sun would reach first.
Look picture bellow (Removed the "sun" because you understand what I mean right?)

Pokeball 2 - click with mousewheel

After that, we're going to make it darker around the edges, to make it look like ball/circle w/e.
Ofcourse another option you have is dithering which I added too :3. (optional like I said, no need to if you don't know how).

Pokeball 3 - click with mousewheel

Done, Remember this is the same "technique" as you use at the characters, make the armor lighter on the chest part etc.
And to the "sides&hips" w/e you should shade it some darker, remember to practice and not to give up xD.

Any other questions, feel free to ask :D.

Edit: I just felt like posting this piece of work, It's made with 16 colors and used the same "light source" technique as Endless online, Left corner Click.
Pixeling is all about making things pixel by pixel, and not using any "handy" tools.


13 years, 43 weeks ago
Post #42818 Re: Pixeling guide for new people.


Hey so i made a small robe wih a hood. im gunna post it in a sec. :D tell me what u think Please be brutal.


@edit    http://i794.photobucket.com/albums/yy228/Panda_esper/ZenRobe.jpg

                   ^^^^^^^^^^ Pic :O its called Zen Robe

13 years, 43 weeks ago
Post #45912 Re: Pixeling guide for new people.

[Bump] This guide is really really good for beginers, i think this should be a sticky if that's possible on this forum?

13 years, 39 weeks ago
Post #46018 Re: Pixeling guide for new people.

This guide is amazing, the shading is tricky to get at first and getting the right shape but i guess that is never going to be easy with no pixeling experience. I think it deserves a +2 but oh well. Thanks alot :D


(We should be able to favourite topics onto our profiles, Im getting too many bookmarks :()


EDIT:

Made a topic for my pixels thanks to this guide https://eoserv.net/forum/topic/9415

13 years, 39 weeks ago
Post #94491 Re: Pixeling guide for new people.

Please check this guide out before Stava's more advanced one in shading, his pictures are better but mine has some text to explain the basics.

-Bump. (stava's shading guide is:https://eoserv.net/forum/topic/15305)

12 years, 39 weeks ago
Post #96649 Re: Pixeling guide for new people.

i got graphics gale just i dont no how  to use it how do u use it??

12 years, 38 weeks ago
Post #97933 Re: Pixeling guide for new people.

In what format do I save the pixels?


Great guide btw :D Loved it, helped me tons !

12 years, 37 weeks ago
Post #97934 Re: Pixeling guide for new people.
Luksdes posted: (21st Aug 2011, 05:09 pm)

In what format do I save the pixels?


Great guide btw :D Loved it, helped me tons !


.bmp for replacing eo graphics.

.png or .gif for showcasing. 

Never .jpeg
---
Yep.
12 years, 37 weeks ago
Page: << 1 2 >>
Topic is locked.
EOSERV Forum > Artists > Pixeling guide for new people.